
Personal
Car Stuff
Extras

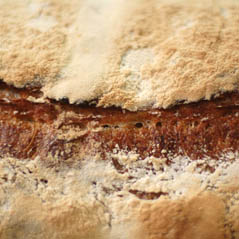
Pain de Campagne
From Raymond Blanc's Kitchen Secrets (BBC): http://www.raymondblanc.com/
A simplified traditional bread recipe demonstrating the miracle of the action of yeast. Yeast is a living organism, a fungus which feeds on the sugar naturally present in the flour and transforms it into carbon dioxide pockets, creating the rise. It is this activity that together with the kneading of the dough creating elasticity, produces a light texture and great flavour. This traditional slower proving is in complete contrast to breads that we find in our supermarkets. For this recipe you will need a food processor with a dough hook attachment. The dough starter needs to be prepared 12 hours in advance.
Makes 2.1kg/4lb 10oz of bread
For the dough starter
5g fresh yeast
135ml/4¾fl oz cold water
100g/3½oz strong white bread flour, preferably organic
100g/3½oz rye flour
For the campagne dough
680ml/1 pint 4½fl oz tap water
940g/2lb 1¼oz traditional white bread flour, preferably organic, plus extra for dusting
130g/4½oz rye flour
15g/½oz fine sea salt
22g/¾oz fresh yeast
1. For the dough starter, whisk the yeast into the water until dissolved.
2. Mix the white and rye flours in a separate bowl until well combined.
3. Pour the yeast mixture over the flours, whisking well to form a thick paste. Cover the bowl with a damp tea towel and set aside to ferment for at least 6 hours and up to 18 hours at room temperature. You can use dried yeast but you will only need half the quantity. Yeast is dormant at 4C, active between 20-40C and destroyed at 45-50 C. Using a dough starter in bread making gives a greater complexity of flavour; as the yeast activates and feeds on the natural sugars present in the flour, over time it produces a distinctively tangy or sour taste.
4. For the campagne dough, line 2 large baking trays with greaseproof paper.
5. Add the water to the fermented dough starter and mix well to combine.
6. Place the white and rye flours into a food processor, set with the dough hook. Add the salt to one side of the bowl of the food processor, then add the yeast to the other side, being careful not to let the salt and yeast touch at this stage, as the salt will attack the yeast and damage its ability to ferment.
7. Add the starter dough mixture to the food processor and mix on a low speed for 5 minutes. The slow mixing process will give the flour the opportunity to fully absorb the water. (NB: This can be done by hand if you don't have a food processor with a dough hook attachment.)
8. Scrape the dough from the sides of the bowl of the food processor and from the dough hook, then continue to mix on a medium speed for a further 5-7 minutes, or until the dough is smooth and elastic The faster speed will warm the gluten in the flour making the dough elastic and creating the right environment for the fermentation to happen..
9. Scrape the dough into a neat ball and cover the bowl with cling film. Set aside to prove at room temperature for 1 hour, or until it has doubled in size.
10. When the dough has proved, turn it out onto a lightly floured work surface using a scraper if necessary. Cut the dough into four equal pieces.
11. Shaping & preparing the bread. The dough can be shaped in any way you choose. For a campagne-style loaf, fold the dough evenly in half towards you. Seal both edges together with the heel of your hand. Roll the dough back and forth on the work surface, then shape each into a long oval and place, joint-side down, onto one of the prepared baking trays lined with greaseproof paper. Repeat with the remaining dough. Cover loosely with cling film and set aside to prove again for at least 1-1½ hours.
12. Meanwhile, preheat the oven to 250C/475F/Gas 9 or to its maximum setting (this is critical as the temperature will decrease significantly when you open the door) and place a baking tray in the middle of the oven and a roasting tin on the bottom.
13. Dust the loaves with flour, then slash each loaf down one side.
14. Slide the loaves onto the preheated baking tray in the middle of the oven, using the greaseproof paper to transfer them and pour 50ml/2fl oz of water into the roasting tin on the bottom. This will generate steam within the oven creating a good crust on the bread.
15. Bake the loaves for 15 minutes, then reduce the oven temperature to 220C/425F/Gas 7 and bake for a further 10 minutes, until golden-brown and cooked through. (The loaves are cooked through when they make a hollow sound when tapped on the undersides.) Remove from the oven and set aside to cool.
Chef’s Notes:
*1 The choice of flour is important; we recommend Shipton Mill flour (in Gloucestershire) or Waitrose flour line. Depending on the time it has been stored, the variety and its nutritional composition, the flour will absorb more or less water when making the dough. Another important factor is the strength of the flour, bread requires a ‘strong flour’ with a higher protein (gluten) content than regular flour, which will provide better elasticity to the dough and a better texture to the loaf. We use rye flour in this recipe for flavour and the fact that it contains more skin inside, therefore more natural ferments in the mother dough.
*2 I if fresh yeast is unavailable then dried yeast can be used – but use half the quantity. Iit is important to know that yeast is sleeping at 4°C, best active between 20-40°C and destroyed at 45- 50°C.
*3 Weigh yeast and the salt separately, as the salt will dehydrate and kill the yeast if in direct contact.
*4 The proving time in a bread recipe is based on a dough’s behaviour at a certain temperature. Oour recipes are based on a temperature of 20°C (a standard room temperature). At this stage, if the dough is above 25°C you will activate fermentation and reduce the flavour in the bread.
*5 if the dough dries out it will form a crust and not prove properly.
*6 When the bread is proven, you should see some signs of blistering on the surface of the dough, at this stage the dough will be very fragile to manipulate, which is why we have placed the dough on silicone paper to facilitate putting the loaves into the oven.
*7 The sharpness of the razor blade will avoid any drag on the dough. Eensure the cut is not too deep and at an angle to create an attractive finish to the bread. Iif the cut is vertical it will open up the bread.
