
Personal
Car Stuff
Extras
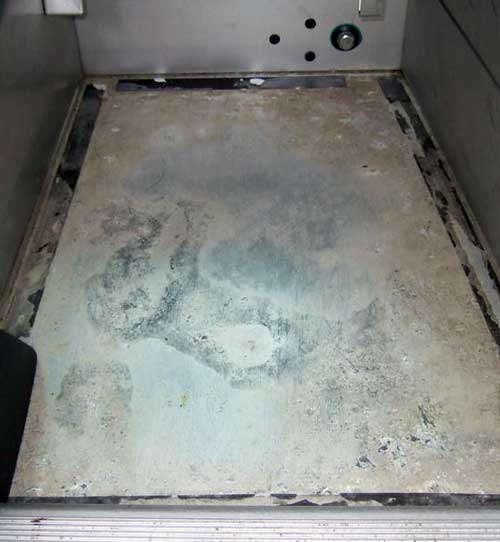
Floor Corrosion
Elise footwells in the S1 and early S2 models have been prone to corrosion under the rubber mats. The following photo shows typical damage.
Original Lotus statements
ELISE FOOTWELL FLOOR CORROSION Lotus is aware that a small number of Elise models factory fitted with synthetic mats in the footwells, have experienced some cosmetic corrosion of the top surface of the aluminium footwell floor panels. The cause of the corrosion is a complex chemical reaction within the moisture and salts which tend to become trapped between the floor surface and PVC matting. Lotus fully understands that this cosmetic corrosion has caused concern to some of the affected customers and would like to reassure all owners that the footwell floors are not part of the primary load bearing structure of the car and that this corrosion does not compromise the integrity of the chassis.
All PVC based matting was deleted from production specifications of the Elise in early 2004. Owners of Elise models factory fitted with either the black synthetic (rubber like) or grey synthetic chequer plate patterned footwell mats, are offered the opportunity to upgrade from these mats to new breathable black carpets. These breathable carpets will provide suitable ventilation of the footwell floor surfaces.
Lotus authorised dealers will be pleased to assess the footwell floor condition of your vehicle and then arrange a convenient time to carry out the appropriate improvements. Where little or no corrosion is evident to the footwell floors, a colourless anti-corrosion fluid will be applied to the footwell surface. In other cases, where more corrosion is evident, the original floor will be treated and a secondary floor panel will be bonded and sealed on top of each of the existing footwell floors. In all cases new breathable black footwell carpets will be fitted.
Whilst the footwell condition of the majority of vehicles will not amount to a failure under the terms of the 8 year chassis anti-corrosion warranty provided with the vehicle, in order to maintain customers confidence, Lotus will, as a goodwill gesture, undertake the above treatment and improvements free of charge to any Elise within its 8 year chassis anti-corrosion warranty which was factory fitted with the PVC based floor mats (standard warranty terms and conditions will apply). Any concerned customer should contact their authorised Lotus dealer to discuss appropriate arrangements. Customers may prefer to have this work carried out in conjunction with a maintenance service or other repair work and should therefore discuss this with their authorised dealer.
The U.K. Vehicle Inspectorate has confirmed to Lotus that as the footwell floors are not part of the primary load bearing structure and any corrosion of these panels does not compromise the integrity of the chassis, a corroded or perforated floor panel is not in itself grounds for a U.K. MOT failure. Any queries related to MOTs should be directed to the Vehicle Inspectorate Enquiry Unit on telephone number 0845 6005977, quoting vehicle test station number and the date of test.
Lotus recommends that routine car cleaning and maintenance by Elise owners should include lifting the footwell carpets and cleaning and, if necessary, drying the floors.
If customers have any queries in connection with this issue they should contact their authorised Lotus dealer who will be happy to assist.
--------------------
"Lotus has recently become aware that some Elise vehicles have suffered cosmetic corrosion of the top surface of the footwell floor panels when floor mats have been fitted. Note that the footwell floors are not part of the primary load bearing structure, and that the integrity of the chassis is not considered to be compromised by this condition.
Our engineers are currently working in conjunction with the chassis manufacturer to identify the causes of this concern and formulate any necessary preventative and remedial measures.
In the meantime, for any car found to be affected, the following cleaning procedure is advised:
- Remove any footwell floor covering to reveal the alloy surface.
- Wash the footwell floor and underside of the mat using a nylon brush and clean water (do not use soap solutions as these often have a high salt content).
- Allow the floor and mat to dry thoroughly before refitting the mat.
- Retain the mat using a 25 mm wide strip of double sided tape only along the rear edge.
- It is important to lift the mat periodically and wipe the floor and mat underside to ensure the area is kept dry.
- No other action should be taken at this time in order to protect against possible interference with any future recommended treatment."
Whilst the footwell condition of the majority of vehicles will not amount to a failure under the terms of the 8-year chassis anti-corrosion warranty provided with the vehicle, in order to maintain customers confidence, Lotus will, as a goodwill gesture, undertake the above treatment and improvements free of charge to any Elise within its 8-year chassis anti-corrosion warranty which was factory fitted with the PVC based floor mats (standard warranty terms and conditions will apply). Note that this work does not extend the new vehicle corrosion warranty beyond the original 8-year time period.
Lotus recommended fix
In order to inhibit the potential development of cosmetic corrosion
of the top surface of the footwell floors, owners of Elise models
factory fitted with either the black synthetic (rubber like) or
grey synthetic chequer plate patterned footwell mats, should be
offered the opportunity of upgrading from these mats to the new
breathable carpets.
This bulletin describes the procedure for examining and assessing the footwell floors, and specifies the appropriate recommended floor treatment before fitting breathable carpet.
Preparation
1. From both footwells, remove all floor covering, including where fitted; synthetic mat, carpet, foam insulation, sound damping sheet; to reveal the alloy footwell floor surface. If fitted, remove the passenger footrest.
2. If corrosive deposits of either a powder or paste like nature are present, wear suitable hand and eye protection, wash the footwell floor using a nylon brush and clean water. Mop the floor using paper towels and allow to dry thoroughly.
3. Remove any double sided tape residue using a plastic spatula (e.g. ice scraper) and proprietary Brake Cleaner fluid observing all appropriate health and safety precautions.
4. Examine the floor surface for evidence of corrosion.
a). If no significant signs are apparent, with only discoloration,
staining (but no significant areas of dark grey) and/ or fewer than
10 superficial surface defects, 'Procedure A' below describes the
recommended procedure for protecting the footwell surface and fitting
breathable carpets.
b). If corrosion of either footwell is found to be in excess of that described in (4a), 'Procedure B' below describes the recommended procedure for fitting secondary floor panels and breathable carpets.
Procedure A
Parts Required (as necessary)
Part Number & Qty:
Carpet Set, RHD, black A117V0733S, 1
Carpet Set, LHD, black A117V0734S, 1
Fixing Stud, lower A117U6009F, 4
Fixing Stud, upper A117U6008F, 4
Velcro Strip, hook, self adhesive A111V6020V, 0.5m
ACF 50 Solution A117A0239S, 1
1. If not already fitted, position two new carpet retaining studs in each footwell using the new carpet as a template, and stick to the floor using a suitable locally sourced proprietary adhesive (e.g. Sikaflex). Stick half the length of Velcro strip to the front of each footwell approx. 20mm from the front edge, or from the passenger footrest.
2. Spray the whole top surface of the footwell floor panels with ACF 50 (Anti-Corrosion Formula) solution A117A0239S, and wipe dry using paper towels. Apply a second coat to any areas showing evidence of corrosion, and wipe dry. Allow to air dry thoroughly.
3. Fit a pair of new 'breathable' footwell carpets using two fixing studs for each carpet. If applicable, refit the passenger footrest and trim the carpet to suit. If the customer wishes to fit any additional floor covering on top of the new breathable carpet, ensure this is properly restrained using either the carpet studs, or some other secure device.
4. Ensure that the customer is made aware that the footwell carpets should be lifted periodically and the floor cleaned and wiped dry.
Procedure B
Parts Required (as necessary)
Part Number & Qty:
Secondary Floor Panel Set A117A0235S, 1
Betaclean 3900 Degreaser A100B6008V, 1 litre
Betaprime 1707 A+B A111B6374V, 2 x 160ml
Betaprime 5404 Primer A082B6337V, 1 x 250 ml
Felt Applicator, Betaprime A000Z9088F, 4
Betamate 2800 Adhesive B111B6159V, 2 x 80ml
Mixer Nozzle, Betaseal adhesive A000Z9114F, 2
Silastic RTV732, secondary floor panel A036E6027V, 1 x 310ml
Carpet Set, RHD, black A117V0733S, 1
Carpet Set, LHD, black A117V0734S, 1
Carpet Fixing Stud, lower A117U6009F, 4
Carpet Fixing Stud, upper A117U6008F, 4
Velcro Strip, hook, self adhesive A111V6020V, 0.5m
Tool Required: Applicator Gun, floor adhesive A117T0010S*, 1
(*This tool will be mandatorily issued to all dealers and need not
be ordered)
1. Remove the footwell divider panel and (if fitted) carpet retainer studs. Release all loose oxide from the footwell floors using a stiff nylon brush. Clean all loose material and debris using a vacuum cleaner. If any perforations are found, drill or file the holes to ensure that all corroded material is removed from the perforation site. Remove any burrs or sharp edges.
2. Dry fit the secondary floor panels, noting that the driver's side panel needs to be flexed to clear the gearchange mechanism. Trim panel edges if necessary to allow satisfactory fit. Note that any cut edges should be cleaned and primed during steps (3) and (4).
3. Degrease the footwell floors and underside of the secondary panels using Betaclean 3900.
4. Mix the two parts of the Betaprime 1707, and paint the whole of the footwell top surfaces and underside of the two secondary floor panels, using the felt applicator. Allow 30 minutes drying time.
5. Using Betaprime 5404, paint over the Betaprime 1707 on the footwell top surfaces and underside of the two secondary floor panels. Allow 15 minutes drying time. Then, for best results, continue immediately with step 6.
6. Cut the adhesive mixer nozzle to provide a 5 - 6mm aperture, fit onto the Betaseal 2800 twin pack cartridge, and insert into the applicator gun. Extrude sufficient adhesive onto a paper towel to acheive a consistently coloured black bead.
7. Addressing a single footwell floor, apply adhesive directly to any floor perforations to fully seal each hole. Then carefully apply a bead of adhesive around the periphery of the footwell floor, leaving a gap of about 10mm to the edge. Apply a further bead of adhesive in a zig-zag pattern as shown in the drawing overleaf. Note that the adhesive has only an 8 minute 'open' time before the secondary floor panel must be fitted.
8. Place the secondary floor panel into the footwell and apply even pressure to spread the adhesive. Ensure the panel is level and correctly aligned before applying sand bag weighting at front and rear for a minimum period of one hour. Check the underside of the footwell to ensure that adhesive is extruded through any perforations and smooth the material across the hole. Wipe off any excess. Clean any excess adhesive from interior alloy surfaces using Betaclean 3900.
9. Fit a new mixer nozzle before repeating steps (5) to (8) for the second footwell.
10. After a minimum period of 1 hour, apply a fillet of Silastic RTV 732 (A036E6027V) around the edge of each secondary floor panel ensuring that the joint is completely sealed. Smooth the sealant with a spatula for a neat finish.
11. When the Silastic is cured (allow 1 hour), refit footwell divider panel and passenger footrest.
12. Position the carpet studs using the new carpet as a template, and stick to the floor using a suitable locally sourced proprietary adhesive (e.g. Sikaflex). Stick half the length of Velcro strip to the front of each footwell approx. 20mm from the front edge, or from the passenger footrest.
13. Fit a pair of new 'breathable' footwell carpets using two fixing studs for each carpet. If applicable, trim the passenger carpet to suit the type of footrest fitted. If the customer wishes to fit any additional floor covering on top of the new breathable carpet, ensure this is properly restrained using either the carpet studs, or some other secure device.
14. Ensure that the customer is made aware that the footwell carpets should be lifted periodically and the floor cleaned and wiped dry.
Note that the footwell floors are not part of the primary load bearing structure, such that any corrosion of these panels does not compromise the integrity of the chassis. A corroded or perforated floor panel is not in itself grounds for a U.K. MOT failure. Any queries should be directed to the Vehicle Inspectorate Enquiry Unit on telephone number 0845 6005977, quoting vehicle test station number and the date of test.
