|
Supplies,
Exhaust
Removal & Fitting, Drooping
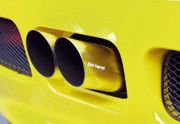
Tailpipes, Anti-Tizz
Exhaust Systems
Compiled by Dot
Check your insurance before fitting a new exhaust, some insurance
companies will consider it a performance modification and charge a higher
premium. The original (or any) mild steel exhaust will rust away over
about 2 years. A replacement stainless steel exhaust will last longer
(about 10 years), but is more expensive.
If it's noise you're after, the use of a cat
replacement pipe & a replacement
air filter will up the decibel level.
Suppliers
Lotus/Janspeed & B&C (http://www.bell-colvill.co.uk/) exhausts are widely
used - see here for some video/soundfiles.
Janspeed is loud and raspy, it's also relatively small & easy to
fit. This seems to be one of the loudest exhausts (get the anti-tizz
bracket fitted at the same time though - part number A111E6234S: or your
local Rover dealer for half the price, part number:WCU100990 (thanks to
MattR for that :o)). The Janspeed stainless steel exhaust is "for track
use only".
The Moto-build (http://www.moto-build.com/mbimages/elise-lightexhaust.jpg)
exhaust is cheaper & lighter than the Lotus one. It' s not as loud
as the Janspeed, but has a deeper, larger box (and is therefore more
difficult to fit).
The Raceline (http://www.raceline.co.uk/) exhaust slightly bangs and
pops in the cold.
The Chris Neil exhaust is also LOUD, and is one of the cheapest, "at
low revs it does pop and blow a little, I'm sure it smoothes out at
higher revs.") http://www.christopherneil.co.uk/acatalog/Christopher_Neil_Exhaust_162.html
The Milltek / Brooke-Kensington (http://www.brooke-kensington.co.uk/lotus.shtml)
exhaust is reasonably priced and has a deep (rather than loud) sound,
some pictures of one here.
Auto Koenig (http://www.auto-koenig.de/dealers/koenig/index.htm)
also do an exhaust, but it's expensive!
Magnex also do a cheap stainless steel version that is very quiet.
Birchwood Way,
Somercotes,
Alfreto,
Derbyshire,
DE55
4QQ
Tel. 01773 831330
Sprint Racing Products (http://www.sprintracing.com/) at Bridgewater in
Somerset produce a deep sounding exhaust, but its reported as being
noisy on motorways.
Exhaust Removal & Fitting, by
Rob Clarke
Tools Required
Good quality 10mm to 15mm Sockets, Wrench, Extension bar (small and
large)
10mm to 15mm Combination spanners
Crowbar (will explain
this one later)
WD40
Allen Key Set (metric)
Medium Phillips
Screw driver
Vaseline
Preparation
1.Remove the undertray, only remove the one piece nearest the rear of
the car.
2.Spray all bolts on the catalyst and exhaust with WD40.
3.Remove the right-hand side of the boot bag.
4.Have a coffee.
Removal
1.Remove the catalyst (15mm nuts), if they feel really stiff soak
them again in WD40 and leave for a while. Then remove the
two
brackets at either end of the catalyst, both of these brackets
are held on by the 15mm nuts.
2.To remove the catalyst you will need to pull the down pipe out of
the way. This is where the crowbar comes in, lever the pipe out
of
the way and the catalyst will come free.
3.On the right hand side of the exhaust you will see a bracket that
is bolted to the exhaust box. Undo these bolts and remove
the
bracket.
4.Now look up on the left-hand side of the exhaust and you will see
another bracket. This is welded onto the exhaust box (this one
is the
pain).
5.Note where the bracket is and go into the boot, you will see a
three 10mm boltheads. Workout which are the bracket and undo
them.
Make sure that someone is below supporting the exhaust.
6.Now the exhaust is free.
7.Use a little force and some creative wiggling and the box will come
off. It is an idea for someone else to guide the tail pipes
through
the body work.
Fitting
This fitting describes a Magnex exhaust but the process should be
very similar for other exhaust systems.
1.Loosely fit the right-hand bracket onto the exhaust box and put
some vaseline on the bracket.
2.On the car refit the left-hand bracket but make sure that the nuts
are only on a couple of threads so that the exhaust can move
on the
bracket.
3.Now offer the exhaust up (make sure that you have put vaseline on
both brackets on the exhaust).
4.Put the exhaust firstly through the bracket on the right, then the
left one. Again it is a good idea to get someone to guide
the
tailpipes through the bodywork.
5.Replace the catalyst and tighten the 15mm nuts on the catalyst (you
will need the crowbar again to move the downpipe).
6.Now tighten the bracket on the right-hand side, you will need to do
this via the boot again.
7.Tighten up the bracket on the left-hand side which bolts onto the
exhaust box.
8.The exhaust should now be fitted correctly.
9.Go to the rear of the car and loosely fit the oval, make sure that
it is level. Once you are happy tighten the brackets on the
tailpipes
(these brackets are near the exit from the exhaust box).
10.Remove the ovals again.
11.Using the sticky pads provided stick the retaining plate between
the tailpipe ends. It goes between the pointy bits of the exit
hole
in the body work (I am sure you will understand that bit when
you are doing it).
12.Fit the backing plate.
13.Fit the ovals again and tighten the allen bolts up.
14.Start it up and make sure there are no rattles.
15.Go around and check that all nuts and bolts and very tight.
16.Refit the under tray.
17.Refit the boot.
Another excellent guide for fitting an exhaust can be found at here.
Drooping
Tailpipes
Daniel Luton
This could be caused by worn-out exhaust clamps securing the
tailpipes to the rear silencer. The symptoms are that the tailpipes will
drop in the exhaust slot (in the rear clam) finally resting on the
bottom edge of the cut-out, and the exhaust will leak, leading to a
noticeable blowing noise. You can push the pipes back up to the center
but they will eventually drop down again.
To fix it, raise the
car onto ramps/axle stands (or a lifting ramp if possible), remove the
rear diffuser, and examine the pipes entering the rear silencer. Each
one is clamped in place by a circular metal clip. The clamps may have
rusted, and are unable to be tightened any further - making them lose
grip on the silencer, which in turn lets it drop down to the
bodywork.
Remove both corroded clamps, and purchase another pair
of 45mm standard clamps from your nearest exhaust centre (approx. £1.50
each). Smear some exhaust sealing past on the two pipe entry points on
the silencer for a better seal, then finger-tighten the replacement
clamps on the pipes (make sure you put them in the same place as the old
ones).
Get someone to support the tailpipes in the center of the
cut-out, then fully tighten the clamps to hold the silencer in place.
Run the engine and check for leaks in the system.
Refit the
diffuser and you're done!
Disclaimer : All information is supplied as a guide only.
No Guarantee as to its reliability can be issued.
You use this information entirely at your own risk.
No Reproduction or Reuse without prior written consent.
© Elise FAQ Team 2002
|