|
Driving
Lamps, Headlamps,
Headlight
Covers, Indicators,
Brakes
Lights
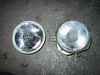
Driving Lamps
Being so low to the ground the driving lamps are extremely prone to
stonechip damage, if you have unbroken lamps or plan to replace on make
sure you fit driving lamp protectors, decent ones are invisible once
fitted and save you the cost and hassle of having to replace a driving
lamp ever again, well worth the £20 that a pair will cost you. One
suppler of these lamp covers is Lotus Ecosse.
Mike Knowles
Driving lights are made by ZKW, and are available at several 3rd
party stockists for a fraction of dealer pricing. This is good, since
it is one of the highest replacement items for an Elise.
A lotus dealer will (more often than not) quote that it is a
clam-off job to replace these, which in the majority of cases is not
true so long as you are okay with (worst case) possibly losing 1mm's
worth of paint from your front clam edge near the lamp. This is due to
the relative awkwardness of replacing these lights with the clam in
situ (it's an easy enough job, just requires a bit of patience and
slimmish fingers).
To replace a driving lamp, first you will need to remove the front
grille, then the lamp is held in with 3 spring-loaded nylon screws,
each have roughly 11 turns of the screw in order to get them held in
place (this is important, as you will need to count the turns of the
screw when refitting the screws).
Make sure you don't lose the screws or the springs in the clam by
blocking up the holes with an old shirt or other rag.
You will find that one of these screws (the lower outermost one) is
usually the hardest to do, both in undoing it and also tightening it
afterwards. Make sure you undo this screw last, and do it up first, as
this will make life much easier. The trick is to use a fairly
slim-shafted but widebladed flat-blade screwdriver, and turn the nylon
screw in half-turns (don't worry when it creaks like a bugger, as
that's normal). Once you have the screw loose, you will be able to
withdraw it from the lamp (but make sure you have fingers available to
retrieve the spring which will then become freed up.
When you have all screws removed, remove the bayonet fitting from
the rear of the lamp, and pull out the two lamp wires from the bulb
(this saves messing about with the wiring fitment behind the bulkhead
grommet as usually the bayonet part hasn't failed) before turning the
lamp itself through a nice contortion of angles etc (just like a
safecracker) to get the nylon mounting lugs past the lip and into the
open so that you can retrieve the old lamp.
Refitment is the reverse of removal of course :-) but obviously
remember to tighten the hardest screw first. This may require a bit of
cursing, pain, and swearing, and possibly attacking the screw at a
slight angle (which helped me at times) {another tip is to hacksaw off
the last 5-10mm of the difficult screw, the full length is not
required and this can significantly aid refitting, file the screw
threads to a chamfer after sawing to help the threads engage - Fd}
The loss of paint from the clam that I alluded to earlier will come
from your screwdriver blade as you attempt to tighten (and/or undo)
this bastard screw. You may want to try and alleviate the damage with
a bit of foam or cloth protection, but you're just going to pick up a
stonechip there anyhow, so it's no big deal - nobody but the biggest
GJOB would notice anyway.
Headlamps
The Elise headlamps are very prone to damage by stonechips and some
people report that the metallic reflector coating corrodes to such an
extent that the lamp becomes useless and/or an MOT failure.
Fd
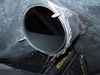
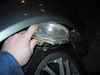
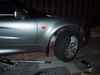
The lamps are very easy to change and available at significantly
cheaper prices than Lotus charge. Access can be gained by jacking the car on the central jacking point until the front suspension is at
full droop, turning the wheel and pulling back the wheel arch liner as shown in the pics above.
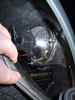
The lamps are mounted on a carrier, which you retain, and the carrier is held in the clam using
3 butterfly nuts on captive bolts. Unscrew the butterfly nuts and don't drop them into the clam !
The assembly order moving out from the clam is, clam | spring | carrier | washer | butterfly nut.
I sourced my replacement lamps from LotusEcosse for a very reasonable price - Thanks Iain ;-)
Total time - about 30-40 minutes per side, including changing the lamp carrier and copperslipping
all the nuts and bolts.
Mike Knowles
The headlamps are manufactured by Cibie, but are NOT the same as
used on the Renault 4, despite being the same diameter (they actually
contain sidelights and have a different lens assembly).
They are 6" in diameter, and have the following code numbers:
CIBIE : CBC 067689
VALEO : 067689
The headlamp mountings (not the headlamps themselves) are notorious
for rusting in situ, and the only solution for this is to replace them
with a non-corrosive item (available from several 3rd party
stockists). This needs to be bonded to the glass fibre and set up
properly.
When replacing the sidelight, please note that the holder is purely
push-fitted into a grommet on the lamp, so watch out that you don't
lose the bulb into the clam when replacing.
Headlight
Covers
Compiled by
Dot
The driving light covers tend to let water in and
become steamed up. This gap can also cause a fair amount of debris to
build up behind the cover. Geary at Elise parts can provide covers in a
kit that includes mounting brackes that screw into the clam allowing
them to be removed for cleaning purposes (if you have the standard Elise
fitted covers such as are standard on the 111S, this is not an option).
To clean inside the covers, there are 2 options:
- Remove the cover. To do this, heat the edges with a
hairdrayer to soften the glue, and then use a piece of fishing wire to
carefully prise off the covers.
- Remove the light and clean from the inside (see
Bruce's instructions below).
Bruce
Posted 25 May
2002 at 12:08:31 UK time
I've recently had my S1 headlight covers done and it
looks great. One of the headlamps wasn't sealed correctly and it
started to cause a bit of condensation. They didn't do the job the
first time round - wasn't sealed right, so I went back, and, it looks
like a silicone sealant that they use. It's been sealed now, and it
was very easy to get rid of the condensation and clean inside the
cover.
I did cheat a little. To get the covers as flush as
mine, you need a 111s front clam. Which is what I now have. The main
difference is that the oval section around the headlamp isn't flush -
there's a few millimeters for the headlamp cover.
However, I've been told that there are covers
specific to the standard clam - thinner covers I think, so that if you
use the sealant approach, it fits quite flush. (Note from Dot:
covers to fit a standard clam are available from Yvo, or Lotus Ecosse).
I'm not sure if the standard lamps have the rubber
ring to ensure that the area inside is completely sealed.
To clean off condensation, you can either remove the
wheel, or just turn it to one side, and pull back the lining. There
are three butterfly nuts holding the headlamp in place. Remove these
and the headlamp comes out.
You can then get your sponge/cloth/leather in there
to clean it out. I then let the car running with the headlamp on to
evaporate any excess moisture, and then went back in to polish it up
from the inside.
The headlamp went back in - this was the trickiest
bit, as theres a big rubber seal around the lamp that didn't want to
go back. But, after the usual cut hands, it went back in, the
butterfly nuts went back in, and its now condensation free.
Dead easy, and it looks miles better that screws,
velco or sticky tape from WH Smiths. Piccies of my covers are
available at http://uk.photos.yahoo.com/skint_n10
Indicators
gnmorgan, Scottish_Elises
Here's how not to spend about £20 and get a nicer looking side
profile on your Elise. You can get clear side repeaters from Vauxhall,
from the new Corsa at a bargain price of £2.99 each. They look good on
dark colours, as smoked ones tend to disappear in the paint (see my
Rover) and they are EXACTLY the same as the orange ones that are
already on. Plus it took me five minutes to fit them both!
The part number is 9196353. Non of this nonsense about pulling out
the wheelarch liner, as in the handbook, you just open the door and
look down the inside of the inner wing where you can see the repeater.
It's held in by a little tab that you can see and if you put a long
screwdriver on it and put some pressure on the tab and get your
fingernail under the repeater it will just pop out!
Simple.
Brakes
TBA
Disclaimer : All information is supplied as a guide only.
No Guarantee as to its reliability can be issued.
You use this information entirely at your own risk.
No Reproduction or Reuse without prior written consent.
© Elise FAQ Team 2002 |